Pilates, created by Joseph Pilates more than 100 years ago, is a low-impact exercise system that uses precise movement, controlled breathing and muscle engagement to strengthen the core and other muscles – and help you move in a better, healthier way.
“Healthy movement is the key to longevity and to our quality of life as we age,” says Mairin Wilde, owner of the Vancouver Pilates Centre and program director of its teacher education program. “We look at where people’s movement habits and patterns are not working for them, and we find better and more efficient ways for them to move.”
Wilde says that “one of the first things beginners will notice is how much concentration it takes to do exercises. Even if you’re doing a leg exercise, for instance, you still have to pay attention to how you’re stabilizing your spine, what you’re doing with your shoulder girdle and where your focus is. This concentration provides a meditative aspect because you literally have to unplug all of your other concerns to focus.”
Joseph Pilates believed that you are only as young as your spine is flexible. So here is a simple series of spine exercises based on the Pilates method that Wilde has created for Renaissance readers.
Do the program sitting in a chair (ideally an upright chair with back support and without arms).
If you have not been active recently or if you have mobility issues, start gently and pay attention to how your body responds. If you feel any strain or discomfort, aim for gentle sensations of effort or stretching. If you have osteoporosis, aim for a moderate range of motion in all spinal movements to avoid compressing joints. Also, when bending forward, place your hands on your legs for additional support.
Illustrations by Jori Bolton
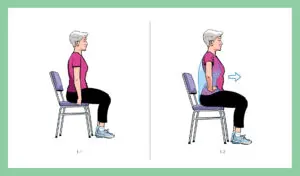
- Sitting Tall (to improve posture)
- Sit with feet firmly on the floor, hip-width apart with toes facing forward. Sit forward away from the back support. Keep spine upright and look straight ahead (illustration 1-1).
- Place hands on hips and roll pelvis forward and back (illustration 1-2) 2 to 3 times to loosen the lower back while remaining erect. These should be small motions that gently round and arch your lower back.
- Now, find your upright posture by balancing directly on top of your sit bones (the small, pointed bones at the bottom of the pelvis) and hold for 5 deep breaths. Imagine your tailbone hanging like a paperweight from the bottom of the spine and your head floating upward like a helium balloon. This erect posture reduces compression along the entire spine and prepares the spine for healthy movement. Try to keep sitting tall this way through all the remaining exercises.

- Deep Breathing (to activate core – deep abdominal, spine and pelvic floor muscles)
Sit comfortably and hold a weight with your dominant arm, arm stretched out long with the palm of your hand facing toward your body. Use a weight that allows you to comfortably do at least 5 to 7 biceps curls, such as a heavy food can or a 5- to 10-pound free weight. With your other arm braced against your body, curl your arm up by bending the elbow through a full range of motion. Return to the starting position – that counts as one move. Start a timer for 30 seconds and count how many biceps curls you can do.
- Place your hands over your abdomen at the waistline and notice how the abdominal wall gently stretches forward as you inhale and recedes as you exhale. Breathe through your nose as much as possible, keeping your jaw relaxed.
- Keep one hand on your abdominals and move the other hand onto the back of your waist, palm facing out (illustration 2).
- Without moving your spine, move the front (abdominals) toward the back (spine). Take 5 slow, deep breaths, allowing your abdominals to slide a little deeper back toward your spine each time you exhale. Imagine them being pulled back from the inside, rather than pressed in from the outside. Remain upright on your sit bones so that the spine remains erect.
- Take 5 more breaths, and this time practise keeping the abdominal wall as flat as possible as you inhale and feel how the deeper muscles can support your spine. The movement of your ribs will increase as your lungs expand more fully on each inhale. Your torso should remain erect without any uncomfortable gripping or “bracing.”

- Spine Stretches (to increase spine flexibility)
Roll Down and Up: Sit tall with arms relaxed by sides. Roll spine forward, from top to bottom, moving one vertebra at a time. Begin by looking down, then rolling neck, then upper back forward until you feel your lower back lengthen and your hips hinging forward, with arms hanging beside your legs (illustration 3-1). Imagine you are lengthening your spine over a beach ball to avoid collapsing the front of the torso. Roll as far forward as you comfortably can, then pause and take 5 to 7 deep breaths, relaxing the torso over the legs. (For more support, use a pillow on your lap.) To roll up, reach down toward the seat of the chair with your tailbone, rolling pelvis backward until you are balanced on your sit bones, then uncurl the rest of the spine from the bottom to the top, bringing your neck and head up last.
Roll Down and Up with Breath Pattern: Repeat the Roll Down and Up, but this time move continuously as you exhale and inhale to roll down, then exhale and inhale to roll up. Repeat 5 times.

Chest Lift: Sit with your hips close to the back of the chair seat. (Depending on the height of the back of the chair, you may prefer to place a small pillow or rolled towel behind your upper back.) Place your hands behind your head with fingers interlaced to support head and open elbows to the sides as far as you comfortably can. Lean back against chair (or pillow) and lift chest upward (illustration 3-2). Look up at the ceiling, letting hands support the head and keeping your neck long. (If you have shoulder mobility issues, this series can also be done with arms by your sides, or resting hands on thighs). Take 5 to 7 deep breaths, feeling your chest rise as the ribs expand on each inhale. Slowly return to sitting tall, using your hands to help lift the head upright.

Sitting Twist: Sit tall with hands on chest, one hand crossed over the other below your collarbones. Twist spine to the right, starting from the top of the pelvis, then sequentially rotating each vertebra through the waist, chest and neck to look as far around to the right as possible (illustration 3-3). While twisting, imagine that you are “loosening the lid of a jar.” Untwist sequentially from the bottom to the top, starting at the pelvis and continuing to bring the ribs and then the head back to centre. Repeat, twisting to the left. Alternate sides 5 times. Practise taking a full breath (in and out) to twist and another full breath (in and out) to untwist.

Side Bend: Reach left arm overhead (if you have shoulder limitations, place left hand on the centre of your chest). If you like, you can use the other arm to support you on the seat of the chair. Inhale to lift head and chest into a side bend to the right (illustration 3-4). Imagine you are lifting your spine sideways over a beach ball, keeping both sides of the torso long. Exhale to keep lifting spine into the bend as far as you comfortably can. Take a full breath (inhale and exhale) to lift the spine upright, moving sequentially from the bottom to the top to bring the head up last. Change arms and repeat on the other side. Alternate sides 5 times.